Last updated on December 7th, 2023
When you take a photo, what is the first thing that you usually do? You probably adjust your camera settings to get the best possible shot. White balance is an essential setting on cameras because it allows us to depict real or fake colors. So when you take photos of people or objects, they will look like what they should be rather than looking blue or yellow.

What is White Balance?
White balance is the process of removing any color casts from your photos. You might also hear people refer to it as color balance, as it allows you to change the white point in your camera. Without this setting on your camera, all of your photos would look too blue or yellow because our eyes adjust for whatever colors are around us. In other words, what we see isn’t what exists in the photo.
There are three types of white balance adjustments:
- Auto—will attempt to remove any color cast automatically by using a built-in algorithm that analyzes the scene
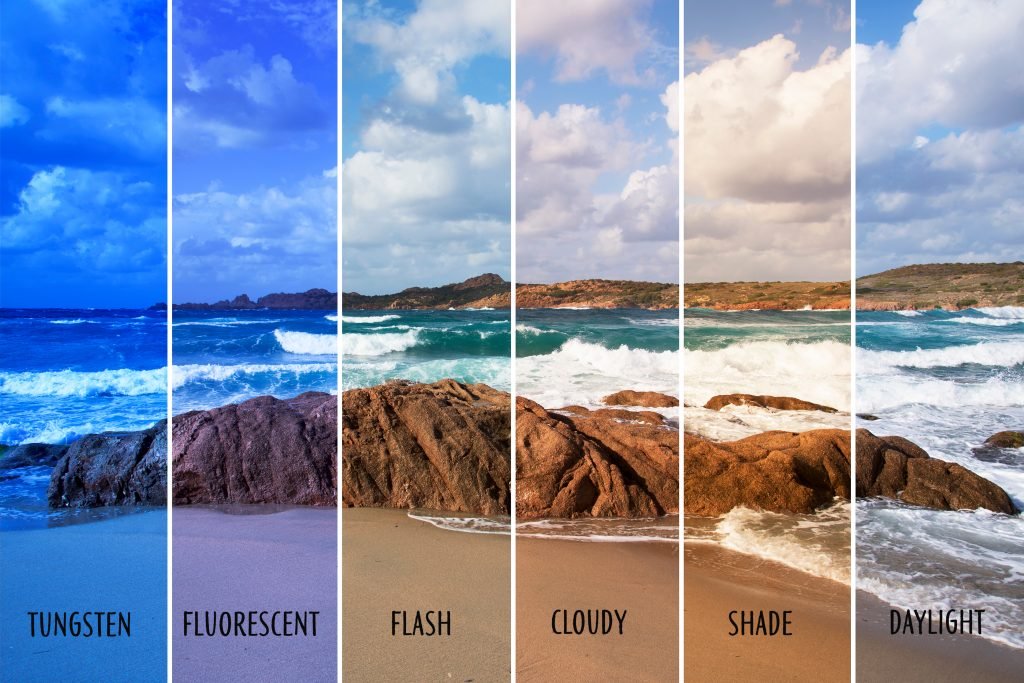
- Preset—Preset white balances include daylight, cloudy, tungsten light (or household lamps), fluorescent light (or office lights), and flash
- Custom—you can set custom white balance manually to get more accurate colors for your pictures
Why Does White Balance Matter?
As previously mentioned, what we see isn’t what exists. That’s why it matters to have the white balance set on your camera. If you don’t adjust it properly, what people look like in photos will not be true to their appearance.
You might be unsure of what color cast has been added or removed from a photo. You can always look at the grey card and adjust your white balance settings until the color cast disappears.
When Should You Change the Setting for Different Lighting Conditions?
The Kelvin scale, which ranges from 2,000K to 10,000K, is used to measure the color temperature of lighting sources. You can change what temperature your camera is set to make certain parts of your photo warmer and other parts cooler.
For instance, if you’re shooting outdoors and there’s too much blue in your photo. Try setting your camera’s white balance to 5,200K for an incandescent light bulb look.
If you’re shooting indoors under fluorescent lights, set your camera’s white balance between 3,000-4,000k for best results. With digital cameras, you can get great shots without having perfect white balance—you can always correct them later on a computer.
How To Set Your Camera’s White Balance
There are different methods of setting your camera’s color temperature, and they vary depending on what brand you have. However, most cameras allow for this type of adjustment by either pressing a button with the WB logo or selecting it from one of the menus. You can then choose what lighting you are shooting in, and you should set your camera.
Some cameras allow automatic white balance adjustment by using its built-in algorithm to see what color cast is present. Others only enable preset customizations depending on what light source you’re using. It doesn’t matter what type of camera you have with digital cameras because what matters is what your final product looks like.
How To Fix White Balance in Post-production
After you take your photo in RAW format, you can go ahead and adjust the white balance depending on what software program you use. There are different methods of correcting white balance after the fact. Each technique involves using a color wheel to adjust what colors will change.
Removing Unwanted Colors
If there is too much yellow in an image, for instance, then you should make the yellows bluer. It makes a photo look realistic and accurate, rather than what it looks like with the white balance not appropriately adjusted.
To fix the white balance, use the eyedropper tool and click on a neutral area in your photo. This will remove any unwanted color casts.
Achieving Warmer Looks
If what you want is a warmer look, then select a reddish area. This adjustment will remove the white balance while shooting and allow for the deeper tones to shine through.
Using these techniques, you can fix white balance issues by adjusting what they see until it looks like what exists in that setting.
Tip: Make sure you save your work as a new file with a different name so that you don’t overwrite the original picture after you edit.
Conclusion: Using White Balance in Photography
By now, you should better understand what white balance does and why it is essential to use the proper setting.
Make sure that what you see in your final product matches the original photo you took. You wouldn’t want any unwelcome surprises when revisiting your work.
Always remember what light source you are working with, regardless of indoors or outdoors. If you don’t adjust what appears on the screen right away, images will look different from intended. You won’t want to do a lot of editing in post-production. You’ll save effort and time.


