Last updated on May 13th, 2023
Acne and blemishes are quite unpleasant and everyone could do without it. While it may take a very long time to do away with it on the face, you don’t have to wait that long to do away with it in photos. Yes, they might take a photo from 100-0 but you can get your photo back up to a 100. There’s no way you want to share such a picture on your website, social media pages or send it to a client when acne or blemishes have reduced its quality. This doesn’t mean you should resort to discarding the photo or filing it away in the ‘never to be posted’ folder. Not when you could easily whip out the Photoshop CC app and remove the acne or blemishes.
The steps needed to achieve this goal are pretty easy to follow and are very detailed as well.
Steps to follow to remove acne/blemishes in Photoshop CC
Once you have opened the photo in Photoshop,
- The first thing you have to do is to create a hue and saturation adjustment layer via the ‘Adjustment’ option.

- Select the ‘Reds’ color range option form the properties panel. This would help place focus on the redness of the acne or blemishes

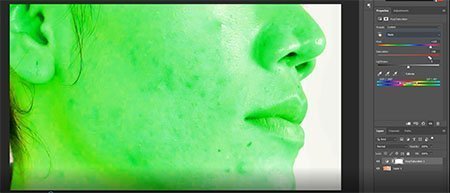
- Increase the hue and saturation values by moving the slider towards your right-hand side. The purpose of this is for the easy identification of the affected areas. You would find that the photo automatically becomes green.

- Move the ‘Color’ slider until it shows that only the red areas are going to be affected. The highlighted red areas are those affected with the acne and blemishes

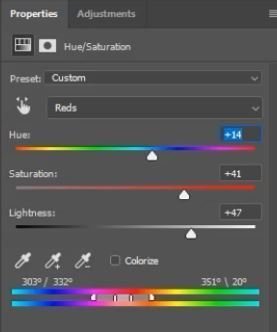
- Return the hue and saturation value to zero. Then, slightly move the hue slider to the right to get a natural skin tone. Moving it to about +14 works fine or just play around with it till the affected areas have a natural skin tone color.

- Increase the saturation of the photo as well by moving the slider to the right, a value of about +41.
- Add lightness to the skin by moving the slider to the right to about +47. Remember that every photo is different so you would have to play around to get a natural-looking photo.
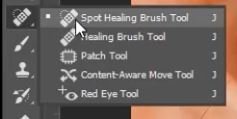
- Use the spot healing brush tool to select all the acne spots on the photo. The brush would sample the skin and remove the pimple. A hack is to select the obvious pimples first before working down to the more blemished areas. Work your way across every inch of the photo that acne is present till they all disappear.

- When everything looks good, then you have to add some color to the lips. To do this, click on the hue/saturation mask layer by the bottom right side of the screen. Then use the black paintbrush tool to paint the lips by tracing out the outline of the lips. This would add more pink into the lips.

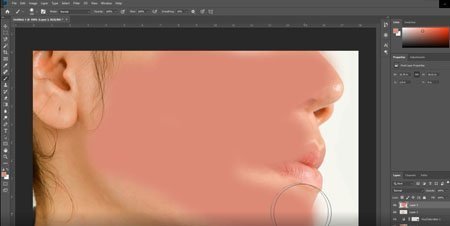
- The next task is to add more color to the skin. Create a new layer again and then select the eye-dropper tool from the right side of the screen and use it to take a sample color from the lips.

- Change the layer from ‘Normal’ to ‘soft light’. Then reduce the opacity level to give the photo a very natural look.

- Easy peasy! You have yourself an acne/blemish-free photo without forfeiting the naturalness of the photo.

You no longer have to keep hoarding or discarding pictures just because acne and blemishes have rendered them imperfect. Following the steps above would see to it that all these become a thing of the past and it would do so in good time!


